-
Best Forex Brokers
Our top-rated Forex brokers
-
No-deposit Bonuses
Live trading with no deposit
-
Brokers for Beginners
Start trading here
-
Forex Demo Accounts
Learn to trade with no risk
-
Lowest Spread Brokers
Raw spreads & low commissions
-
TZS Trading Accounts
Save on conversion fees
-
Islamic Account Brokers
Best accounts for Muslim traders
-
ECN Brokers
Trade with Direct Market Access
-
Market Maker Brokers
Fixed spreads & instant execution
-
All Trading Platforms
Find a platform that works for you
-
MetaTrader 4 Brokers
Top MT4 brokers in Tanzania
-
MetaTrader 5 Brokers
Top MT5 brokers in Tanzania
-
cTrader Brokers
Top cTrader brokers in SA
-
Best TradingView Brokers
The Top TradingView Brokers
-
Copytrading Brokers
Copy professional traders
-
Forex Trading Apps
Trade on the go from your phone
 MetaTrader 4, also known as MT4, is a proprietary standalone trading platform designed for trading and analyzing the financial markets. While it’s most frequently connected with Forex trading it can be used to trade other asset classes. If you want to trade with MT4, this is a comprehensive list of brokers who support MT4.
What is MetaTrader 4?
The MetaTrader 4 was developed in 2005 by MetaQuotes Software Corp. a leading developer of financial trading software. The MetaTrader 4 is the most popular Forex trading platform among retail Forex traders as it is intuitive and easy to use. The MT4 platform is rich in functionality for both novice and professional traders.
The MetaTrader 4 Advantages
MT4 offers low latency execution, ensuring trades are processed ultra-fast. It offers you a large library of technical indicators and the possibility to automate trading strategy through an Expert Advisor (EA). Trading using MT4 gives traders access to a wide range of markets, including currency pairs, commodities, indices, and equities.
How to install MT4?
The MT4 platform can be downloaded for free by directly from the MetaTrader 4 official website, or by downloading it through a broker that has MT4 support. Different versions of the software are available for mobile phones, and different home computers. This installation guide uses a Windows PC as an example.

Figure 1: MT4 Installation
Once the download is finished, click the “Run” button (see Figure 2).
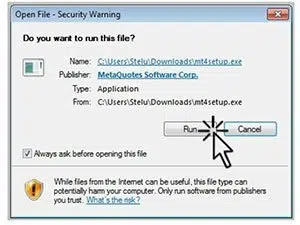
Figure 2: Run MT4
After launching the installation, a new window will pop-up with the “End-User License Agreement” (see Figure 3). First read the agreement before checking off the box “Yes, I agree with all terms of this license agreement.” Click next to continue to the next step.
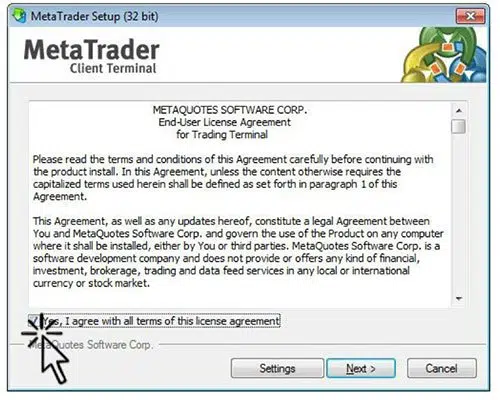
Figure 3: MT4 User License Agreement
Wait until the setup program copies all the files. As soon as all the steps have been completed, click “Finish” to end the installation process.
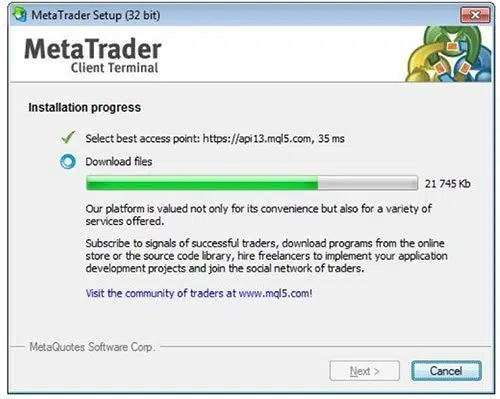
Figure 4: MT4 Installation Progress
If you followed this step by step guide on how to install the MT4 terminal on your computer, you should have successfully installed your first MT4 platform, and you are ready to set up the software.
How to Set Up MT4?
When you first load MT4 your screen should look similar to the one from Figure 1. The only difference will be the name of your preferred broker.
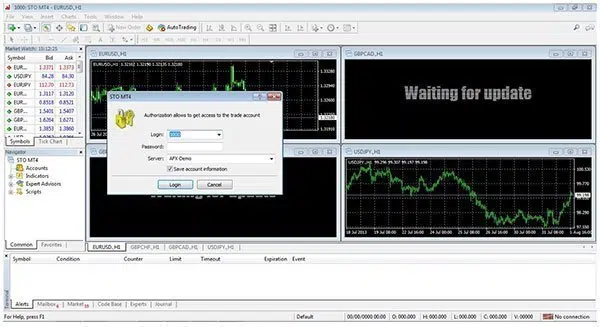
Figure 1: MT4 Platform
The next step will be to fill in the Authorization form (see Figure 2) that allows you access to your first MT4 demo account. Depending on the Forex broker you’ve chosen to trade with you’ll receive the login and password credentials via email. Select the server specified in the email.
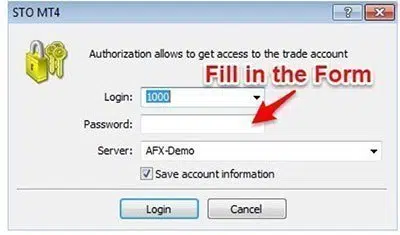
Figure 2: Authorization Form
If the authorization operation was successful you should see a label showing the connection status in the bottom right corner of your screen as shown in Figure 3. Once connected, you have full access to the MT4 platform and you’re good to place your first demo trade and start analyzing the market.
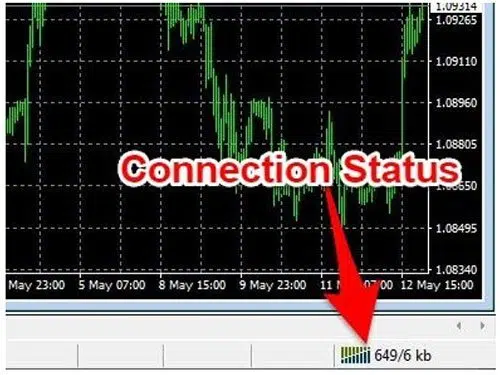
Figure 3: MT4 Connection Status
In case you haven’t already registered for an MT4 demo account, or you inputted the wrong login credentials, then you should see a label showing “No connection” in the bottom right corner of your screen as in Figure 4.
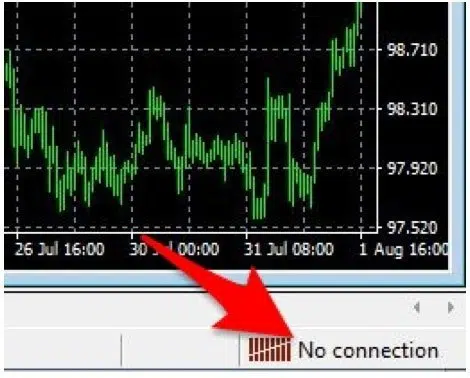
Figure 4: MT4 No Connection
How to open an MT4 Demo Account
Open a Demo Account the File Menu
The simplest to do this is to follow the process described below:
Go to: Menu >> File >> Open an Account >> Select Demo Server
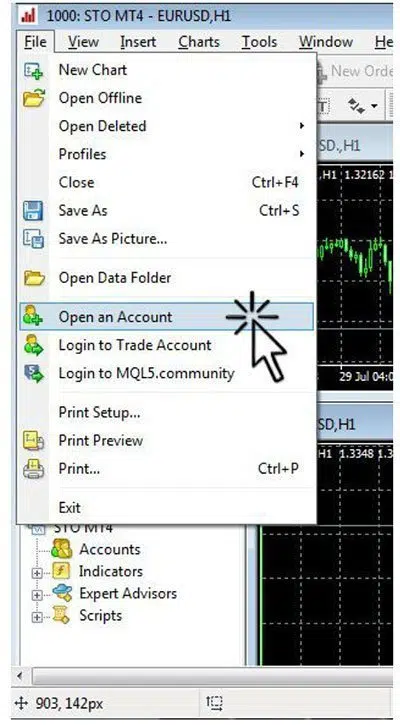
Figure 5: MT4 Open an Account
A new window will appear that will prompt you to select the Trading Server. Choose the server that has the word “Demo” in its name (see Figure 6). The server name might be different depending on the broker you signed up with.
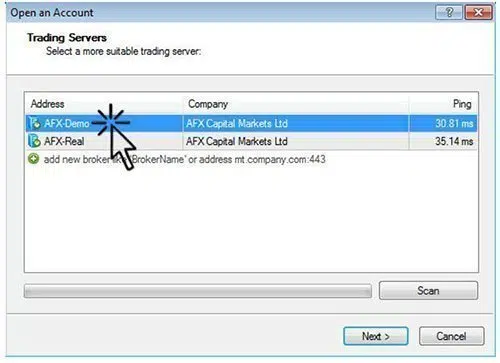
Figure 6: MT4 Trading Servers
A new window will pop up that shows the account types you can choose from. Select “New demo account” (see Figure 7).
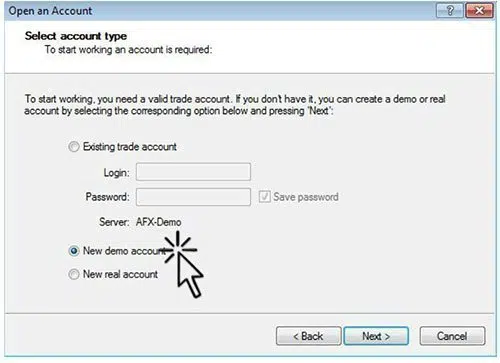
Figure 7: MT4 Trading Account Type
After clicking the next button, a new window will appear prompting the trader to fill out personal details to open the new MT4 demo account (see Figure 8). You need to fill out the following information:
- Name: You can choose either your name or a nickname.
- Email: Your email address.
- Phone: Your phone number.
- Account type: Choose the currency your account will use.
- Deposit: How big your demo account balance is.
- Leverage: Your demo account leverage setting.
After choosing your account and leverage, tick the box “I agree to subscribe to your newsletter” and click next.
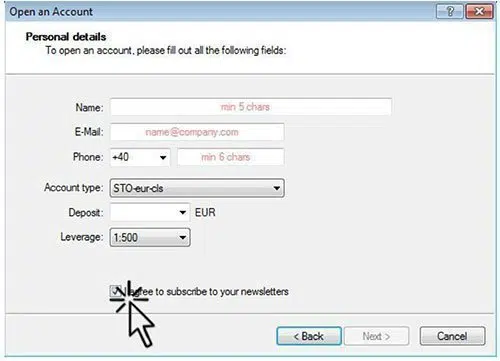
Figure 8: MT4 Personal Details
A new window, shown in Figure 9, will appear giving the trader a login, password, and investor password credentials for the account. You will also receive an email with your login credentials; make sure you save your password as you’ll need it to login into your account at another time. Click the Finish button you’re set to place your first trade.
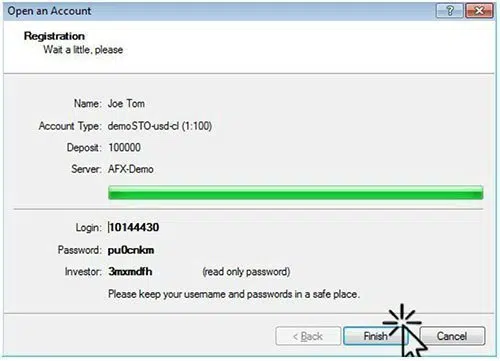
Figure 9: MT4 Account Login Credentials
Open A Demo Account Via The Navigator Tab
The second method used to open a new Demo account is via the Navigator tab on the left side of the screen (see Figure 10). Right click on Accounts to display the pop-up menu and select “Open an Account.” From here, you can follow the same process as described above. If you can’t locate the Navigator tab, then go to top Menu –> View –> Navigator.
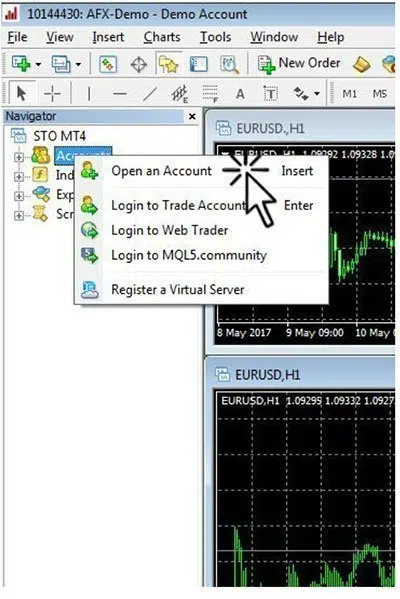
Figure 10: MT4 Navigator Bar-Opening an Account
Logging on to the Account
After you first complete your MT4 demo account registration, you should already be logged in to MT4. If you’re logged out or need to log in with a different account, you can simply go to Menu > File > Login to Trade Account.
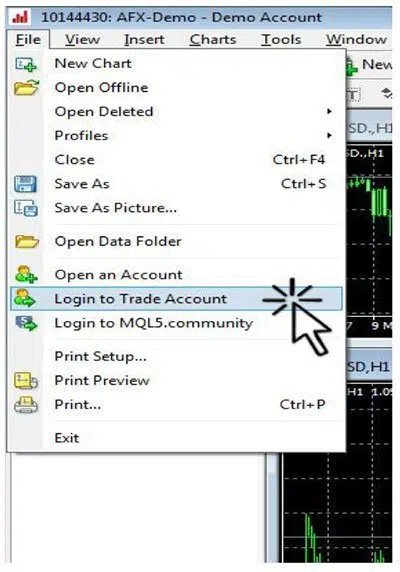
Figure 10: MT4 Login to Trade Account
As an alternative, you can manage multiple MT4 demo accounts from the Navigation tab (see Figure 11)
First Charts
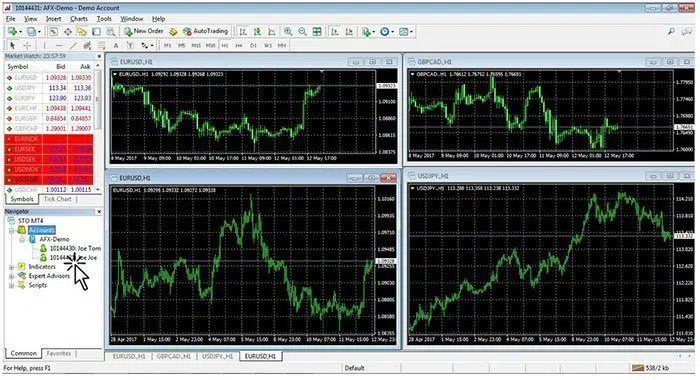
Figure 11: MT4 Navigator – Multiple Accounts
When you first open the MT4 terminal you will have a lot to look at. You should see several charts and windows, and in future sections, we will cover how to navigate through the platform and how to make the best use of its functionalities.
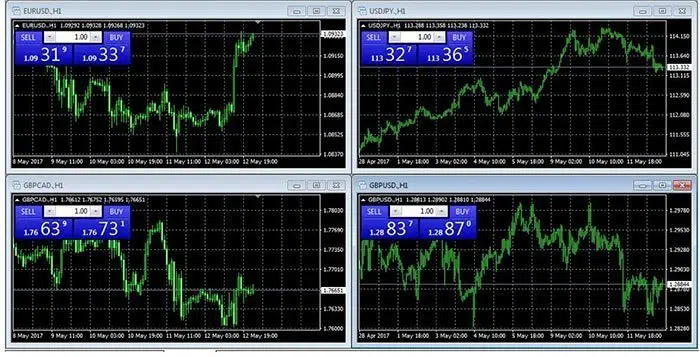
Figure 12: MT4 Initial Chart
MT4 Interface Overview
By default, the MetaTrader 4 platform layout is divided into 6 main components (see Figure 1) as follows:
- Main Menu: File; View; Insert; Charts; Tools; Window; Help.
- Toolbars: Standard; Charts; Line Studies; Timeframes.
- Market Watch Window.
- Navigator Window
- Chart Windows: 4 charts by default, each representing a different currency pair.
- Terminal Window
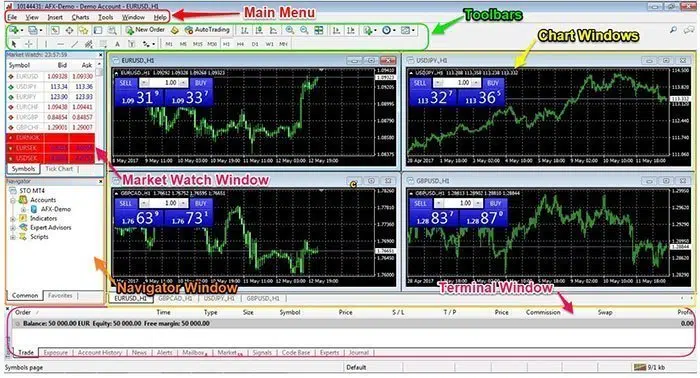
Figure 1: MT4 Interface Overview
MT4 Main Menu
The MetaTrader 4 Main Menu is a collection of all functions that can be performed from inside the MT4 terminal. The Main Menu is located just below the MT4 platform header and consists of six tabs (see Figure 2) that contain different sub-menus.
Figure 2: MT4 Main Menu
The File tab gives you access to the following commands and functions:
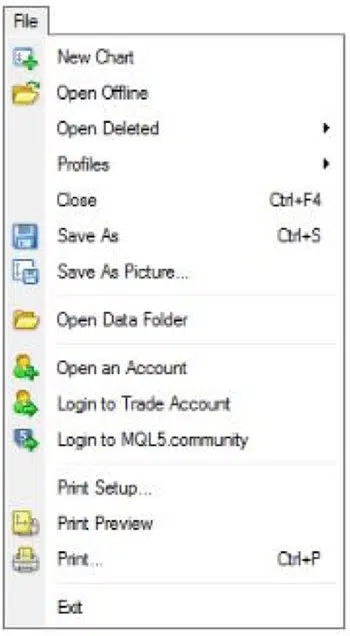
Figure 3: MT4 File Menu
- New Chart: As the name suggests it open a new chart window for your selected instrument.
- Open Offline: Using this command you can open a new chart window in an offline environment. This means that the chart will not be updated in real time with new price quotes.
- Open Deleted: Using this command you can select and restore a deleted chart template. This is useful if you delete one of your charts by mistake.
- Profiles: From this sub-menu, you can manage all your saved profiles
- Close: This function will close the current chart window.
- Save As: This function saves the price history data in different formats.
- Save As Picture: Save a picture of your current chart. You have three options, and for each of them you have the option to “Post image online in the MQL5 Charts Service and get the link” option if you tick the box:
- Active Workspace: It will take a screenshot of the entire MT4 terminal
- Active chart (as is): It will only take a snapshot of the selected chart window.
- Active chart: It will take a snapshot of your chart, but gives you the option to select the picture size.
- Open Data Folder: Open the source folder where all MT4 client terminal data are stored.
- Open an Account: Open a new demo account.
- Login to Trade Account: Open the Authorization Form where you can log in to your different accounts.
- Login to MQL5.community: Access to the MQL5 community, where you can buy trading robots or copy trades from other traders.
- Print Setup: Access to the printing parameters.
- Print Preview: This function will allow you to preview the chart before printing it.
- Print: Print a chart.
- Exit: Shut down the MT4 platform.
The View tab allows a trader to manage your MT4 terminal language, as well as what toolbars should be visible on your MT4 platform. The View tab can give you access to the following commands and functions:
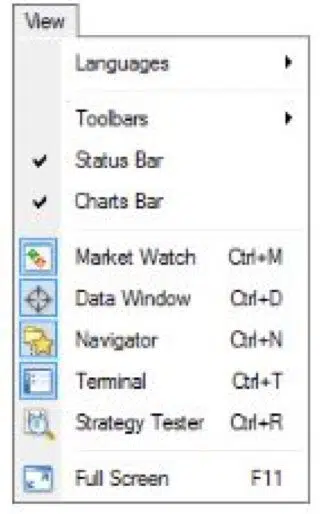
Figure 4: MT4 View Menu
- Languages: Select your preferred language for the MT4 platform. The MT4 terminal supports more than 39 languages.
- Toolbars: This is the sub-menu of available toolbars in MT4. You also have the “Customize” function that allows you to modify the current toolbars, and enable or disable the four toolbar types:
- Standard
- Charts
- Line Studies
- Timeframes
- Status Bar: Enable or disable the status bar located in the bottom of your MT4 platform.
- Charts Bar: Enable or disable the chart bar located at the bottom of the Chart Window. The char bar will allow you to change between open charts.
- Market watch: Open and close the Market Watch window. You can use CTRL+M as a shortcut.
- Data Window: Open and close the Data window. You can use CTRL+D as a shortcut.
- Navigator: Open and close the Navigator window. You can use CTRL+N as a shortcut.
- Terminal: Open and close the Terminal window. You can use CTRL+T as a shortcut.
- Strategy Tester: Open and close the Strategy Tester window. You can use CTRL+R as a shortcut.
- Full Screen: View the chart in full-screen mode.
The Insert tab gives a variety of indicators and objects that can be used with charts. These are the key features of the Insert tab:
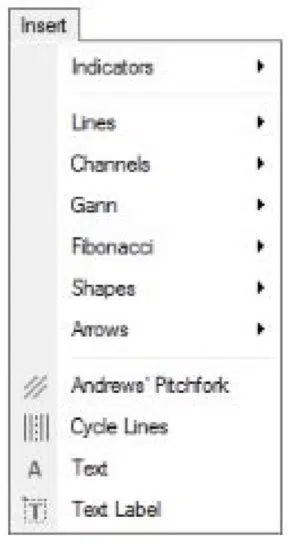
Figure 5: MT4 Insert Menu
- Indicators: The sub-menu includes a large library of built-in and customizable technical indicators
- Lines: The sub-menu offers you different types of trendlines that can be drawn on the charts.
- Channels: The sub-menu includes 4 different types of channels that you can draw on the charts.
- Gann: These are technical tools based on the Gann theory.
- Fibonacci: Tools based on the Fibonacci numbers.
- Shapes: The sub-menu offers you geometrical figures (rectangle, triangle, and ellipse) that you can draw on the charts for technical studies.
- Arrows: Is a collection of symbols (arrows, check signs, stop signs and price signs) that can be placed on the charts.
- Andrews’ Pitchfork: Allows you to insert in the chart the Andrews’ Pitchfork is a trend channel tool.
- Cycle Lines: A technical tool used to find market cycles.
- Text: This function helps you insert a comment on the chart.
- Text Label: This function helps you insert an anchored text on the chart.
The Charts tab gives you access to managing your charts. The Charts tab can give you access to the following commands and functions:
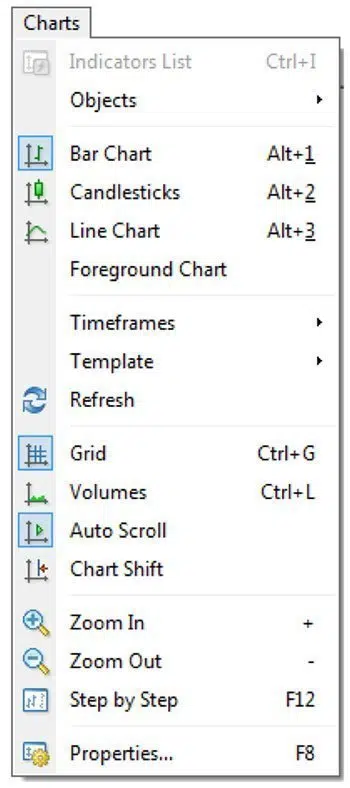
Figure 6: MT4 Charts Menu
- Indicators List: Manage all active indicators on a given chart. Through this command, you can either delete the indicators or edit them.
- Objects: Manage all objects attached to the charts.
- Bar Chart: Display the charts as a series of bars.
- Candlesticks: Display the charts as a series of candlesticks.
- Line chart: Display the charts as a line connecting the close prices.
- Foreground Chart: Place all the objects and indicators behind the charts.
- TimeFrames: Choose different time frames for the charts: 1 Minute, 5 Minutes, 15 Minutes, 30 Minutes, 1 Hour, 4 Hours, Daily, Weekly, and Monthly.
- Template: This sub-menu will let you save, load and remove old templates.
- Refresh: Refresh the chart and if there is missing price data MT4 will try to recover it.
- Grid: Enable and disable the grid overlay on the charts.
- Volumes: Enable and disable the volume on the charts.
- Auto Scroll: Enable and disable the automatic scrolling of the chart to the left once a new bar or candlestick has started to form.
- Chart Shift: Add a buffer to the left side of the chart.
- Zoom In: Zoom in on the chart.
- Zoom Out: Zoom out on the chart
- Step by Step: Move through the chart one bar at a time.
- Properties: Set up the chart parameters.
From the Tools tab, the user can open a new trade and change the MT4 platform Options.
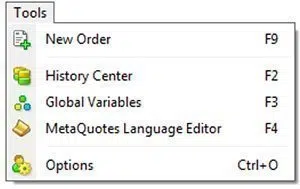
Figure 7: MT4 Tools Menu
- New Order: Open up the new window for order execution. You can place either a market order or a pending order.
- History Center: This is a database of historical price quote data. This data contains the open, high, low and close price data on all time frames available in MT4. You can import or export this data.
- Global Variables: Change all variables used for your custom indicators, expert advisors (EAs) and scripts
- MetaQuotes Language Editor: Opens the MetaEditor of EAs where you can build your own robot by using the MQL language.
- Options: Manage the MT4 platform options including setting up parameters for the connection, trades, charts, EAs, notifications, server, and email.
The Window tab gives users access to manage the chart window.
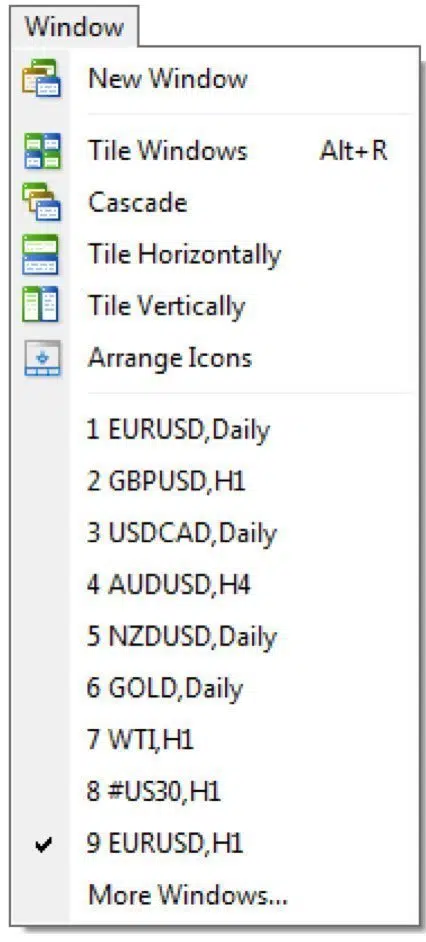
Figure 8: MT4 Window Menu
- New Window: Open a new chart window. It will prompt you to select which instrument you want to open in a new window.
- Tile Windows: Arrange the chart windows as tiles.
- Cascade: Arrange the chart windows in stages.
- Tile Horizontally: Arrange the chart windows horizontally.
- Tile Vertically: Arrange the chart windows vertically.
- Arrange Icons: Arrange the chart minimized chart windows.
The Help tab gives you access to the MT4 platform user guide as well as a large library of links to the MQL5 website for more detailed information. The Help tab can give you access to the following commands and functions:
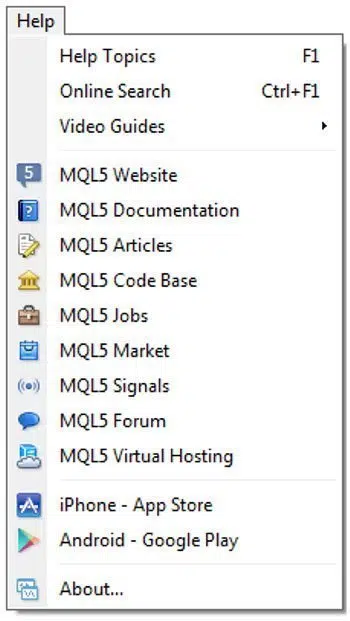
Figure 9: MT4 Help Menu
Customizable Toolbars
The MetaTrader 4 platform has 4 built-in toolbars with different functionalities:
- Standard
- Charts
- Line Studies
- Timeframes
You will notice that the toolbars are separated by minor vertical lines. Every single toolbar command can also be found in the Main Menu. You can customize these toolbars and only assemble the ones used the most. The Standard toolbar contains general commands about the MT4 terminal as follows:
![]() This lets you create a new chart window for any instrument that you select.
This lets you create a new chart window for any instrument that you select. ![]() This lets you manage all your saved profiles. You can save a new profile, remove old profiles and switch between profiles.
This lets you manage all your saved profiles. You can save a new profile, remove old profiles and switch between profiles. ![]() pen and close the Market Watch window.
pen and close the Market Watch window. ![]() Open and close the Data Window.
Open and close the Data Window. ![]() Open and close the Navigator window.
Open and close the Navigator window. ![]() Open and close the Terminal window.
Open and close the Terminal window. ![]() Open and close the Tester window where you can test and optimize your EA.
Open and close the Tester window where you can test and optimize your EA. ![]() This will open the Order window from where you can execute your trades.
This will open the Order window from where you can execute your trades. ![]() This will enable the Expert Advisors on your trading account. The Charts toolbar contains general commands about managing the Chart window as follows:
This will enable the Expert Advisors on your trading account. The Charts toolbar contains general commands about managing the Chart window as follows: ![]() This command will display the charts as a series of bars.
This command will display the charts as a series of bars. ![]() This command will display the charts as a series of candlesticks.
This command will display the charts as a series of candlesticks. ![]() This command will display the charts as a line connecting the close prices.
This command will display the charts as a line connecting the close prices. ![]() This command will zoom out.
This command will zoom out. ![]() This command will zoom in.
This command will zoom in. ![]() This command will arrange the chart windows as a tile.
This command will arrange the chart windows as a tile. ![]() This command enables and disables the automatic shifting of the chart to the left once a new bar or candlestick has started to form.
This command enables and disables the automatic shifting of the chart to the left once a new bar or candlestick has started to form. ![]() This command will allow you to add a buffer to the left side of the chart.
This command will allow you to add a buffer to the left side of the chart. ![]() This command will allow you to insert technical indicators into the chart.
This command will allow you to insert technical indicators into the chart. ![]() This command will allow you to switch the time frames.
This command will allow you to switch the time frames. ![]() Manage all your profiles, including applying a new template to the current chart The Line Studies toolbar contains graphical objects that can be placed on the charts as follows:
Manage all your profiles, including applying a new template to the current chart The Line Studies toolbar contains graphical objects that can be placed on the charts as follows: ![]() The standard cursor for selection mode.
The standard cursor for selection mode. ![]() The crosshair cursor. In this mode, you’ll be able to see the coordinates of the selected point in the chart
The crosshair cursor. In this mode, you’ll be able to see the coordinates of the selected point in the chart ![]() This will allow you to draw a vertical line on the chart.
This will allow you to draw a vertical line on the chart. ![]() This will allow you to draw a horizontal line on the chart.
This will allow you to draw a horizontal line on the chart. ![]() This will allow you to draw a trendline on the chart.
This will allow you to draw a trendline on the chart. ![]() This will allow you to draw an equidistant channel on the chart. The Timeframes toolbar contains different time periods that you can switch between. These chart periods can also be customized based on your own needs.
This will allow you to draw an equidistant channel on the chart. The Timeframes toolbar contains different time periods that you can switch between. These chart periods can also be customized based on your own needs.
Market Watch Window
The Market Watch window contains all the available instruments to trade. The Market Watch window has three columns that contain:
- Symbol: This field contains the instrument name.
- Bid: The bid price quote.
- Ask: The ask price quote.
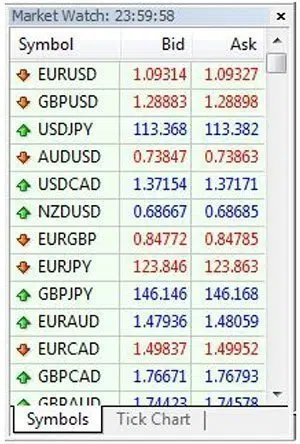
Figure 10: Market Watch Window
Right-click inside the Market Watch window you can add new columns like the spread, the time and the high and the low of the day. Make sure to also select “Show All” which will display all available instruments to trade. You can also open a new trade directly from the Market Watch window by right-clicking on the symbol you want to trade, and selecting “New Order.”
Data Window
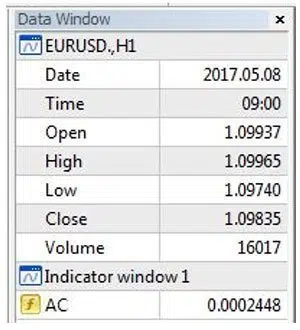
Figure 11: Data Window
The Data Window is used to display general information from the chart. When you move the cursor over the chart, the Data Window will display the following information:
- Date
- Time
- Open
- High
- Low
- Close
- Volume
You’ll also be able to see information about all the indicators attached to the selected chart.
Navigator Window
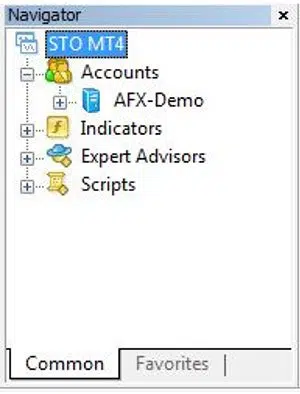
Figure 12: Navigator Window
The Navigator Window will give you the chance to have a quick access to different features of the MT4 terminal. The Navigator Window can give you access to the following commands and functions:
- Accounts
- Indicators
- Expert Advisors
- Scripts
From the Navigator Window, you’ll be able to manage all your Live and Demo accounts as well as switch between them. Another feature of the Navigator window is that it will give you access to the Indicators, Expert Advisors and Scripts available in the MT4 platform.
Terminal Window

Figure 13: Terminal Window
The Terminal Window is a multipurpose window, that allows you to monitor your trades, check your account balance, view open positions as well as managing your EAs. These are the main features of the Terminal Window:
- Trade tab: Manage all your trading activities. You’ll be able to see all open and pending orders, your PnL, account balance and free margin available.
- Exposure: A summary of all your open positions and account balance.
- Account History: Shows a detailed history of all previously closed trades.
- News: Read the most important financial news affecting the currency market.
- Alerts: Manage all your alerts.
- Expert Advisors: This tab will allow you to manage all your EAs, as well as monitoring all the EA’s activities.
Trading with MT4
How to Open a Trade
Open the Order window to execute your trade:
- Press the F9 hotkey;
- Click on the “New Order” button located in your toolbars.
- Right-click on the chart instrument you want to Buy/Sell, and then choose New Order from the drop-down menu.
- From the Market Watch window, right-click on the symbol you want to Buy/Sell and then choose New Order from the drop-down menu.
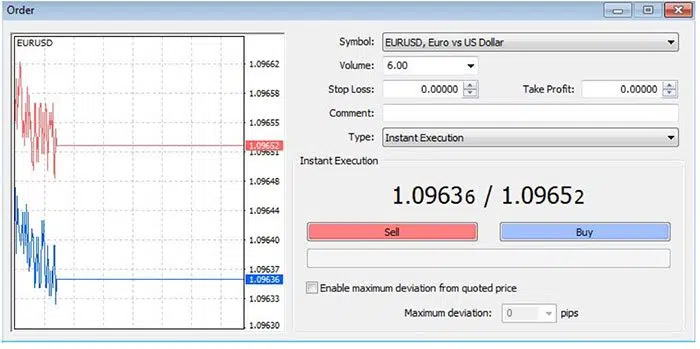
Figure 1: Order Window
The Order window comes with some basic features and options that allow you to properly set up the order the way you want. The following options are available in the Order window:
- Symbol: Select the instrument you want to open a new trade order for.
- Volume: Select a predefined Lot size.
- Stop Loss: Attach a stop loss order to your trade. This is used to minimize your losses and when the instrument reaches this level your trade will be closed automatically.
- Take Profit: Attach a take profit order to your trade. This is used to lock in profits.
- Comment: Assign optional comments to your order.
- Type: Select the type of trade order – either “Instant Execution” and “Pending Order.”
- Sell Button: Open a Sell Trade Order.
- Buy Button: Open a Buy Trade Order.
- Enable maximum deviation from quoted price option: By using this option you can limit the amount of slippage and avoid getting too many requotes.
Once the new trade is executed it will be listed in the Terminal Window as in the figure below:

Figure 2: Terminal Window
Different Types of Trading Orders
The MetaTrader 4 terminal allows you to open two different types of trade orders:
- Instant Execution or Market orders send a request to your broker to fill your trade instantly at the best available price.
- Pending Orders send a request to your broker to fill your trade at a predefined price level.
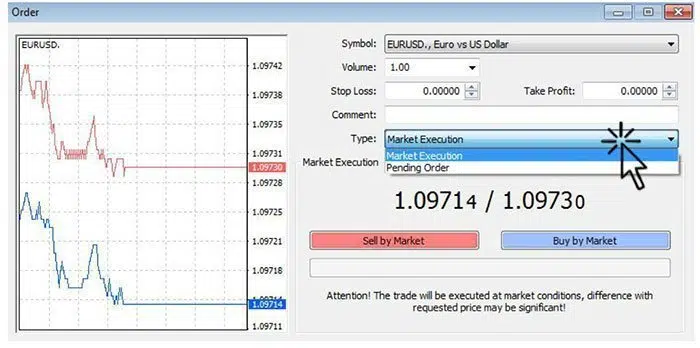
Figure 3: MT4 Order Type
One-click Trading
The MetaTrader 4 platform also allows you to open new orders directly from the chart window. To enable the One-click Trading functionality, right-click and select “One Click Trading” or press ALT+T. This function will enable you to open, modify, and close current open positions from within the chart.
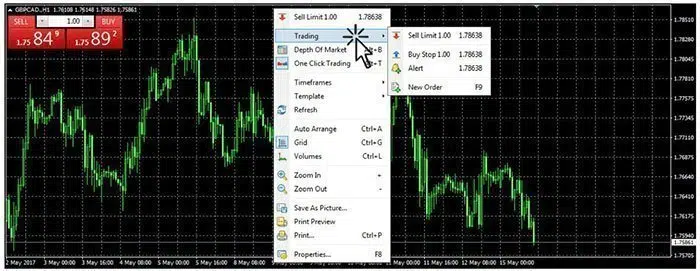
Figure 4: One Click Trading
Once you activate the One-click trading functionality a panel will appear in the top right corner of the chart window. If this is the first time you have activated this feature, a Disclaimer window will pop up. Tick the box “I Accept these Terms and Conditions” and then click OK in order to enable One-click Trading.
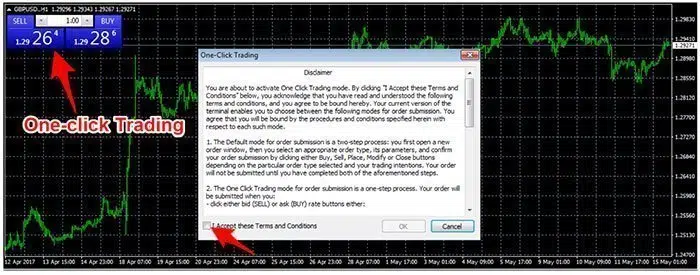
Figure 5: One-click Trading
When trading using this panel, all trade orders are executed instantly at the best available market price. If you want to place a Pending Order directly from within the chart, place the cursor over the necessary price level you want to Buy or Sell, right-click, and select “Trading” (see Figure 5). Before executing the trade the Order, a window will appear so the trader can adjust the trade’s parameters.
Close Position
If your trade has a stop loss order or a take-profit order, then your position will be closed automatically if the price reaches either of the two values. If you want to close the position early you can highlight the trade in the Terminal window, right-click and then select “Close Order” (see Figure 6). As an alternative, you can always double-click or select the “x” sign at the end of the order for the same result. You can also take partial profits, thus making a partial close of the trade, by specifying the amount you wish to close and then just click “Close Position.”
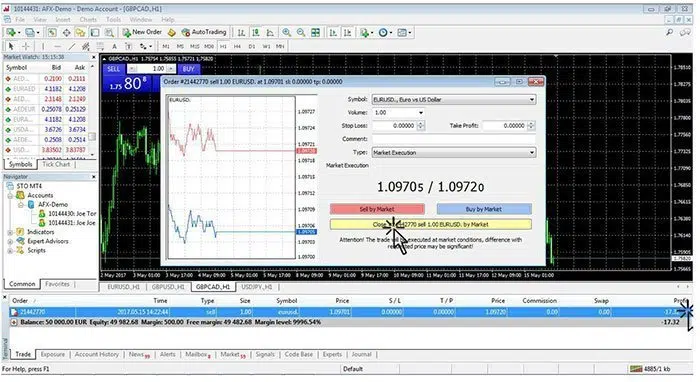
Figure 6: MT4 Close Position
Place Stop Loss and Take Profit Orders
You can modify and attach a stop loss (SL) order and a take profit (TP) order of current trades, by locating a trade in the Terminal window, right-clicking, and then selecting “Modify or Delete Order” (see Figure 7). This action will open the Order Window from where you can attach the SL and TP orders. Double-clicking on the open position in the Terminal window will have the same effect. Usually, your Forex broker will only allow you to place SL and TP if they are at least 10 pips away from the current market price. Once you’re done, click Modify and your new SL and TP orders are attached to your trade.
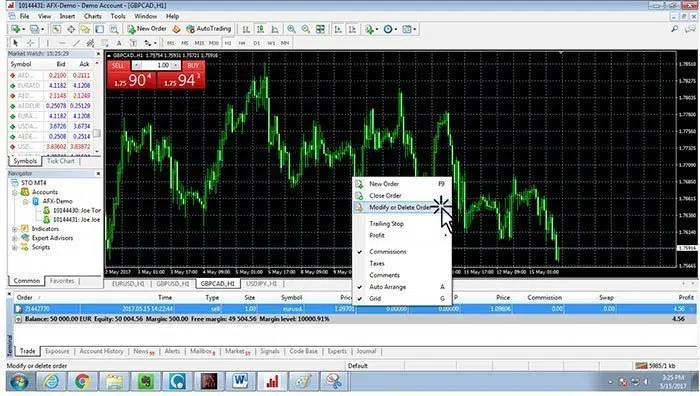
Figure 7: MT4 Modifying a Trade
Algorithmic Trading
If you want to automate your entire trading process, you can develop your own algorithmic trading programs, which are also called automated trading systems or Expert Advisors if they are developed specifically for MT4. This can be a more efficient way of managing your trading activities, but there are pros and cons that come with trading algorithmically.
Pros of Algorithmic Trading
The main advantage of algorithmic trading is that you reduce the emotional engagement in your trading allowing you to eliminate any subjectivity from your trading activities. It also allows traders to backtest a strategy which will give you the opportunity to optimize and fine-tune your trade entries. Your automated strategy can also work while you are not monitoring the market, catching more market opportunities.
Cons of Algorithmic Trading
Mechanical trading systems have also disadvantages. A mechanical trading system can’t adapt to the changing market conditions, which can result in costly losses. Malfunctions or mechanical failures can also affect the performance of your algorithm. Although algorithmic trading might seem to be an easy way to make money, building your own profitable algorithm will require a lot of time and hard work. You also need to be a skilled programmer to develop a profitable system that can profit consistently in the from the markets.
Expert Advisors
An Expert Advisor is an automated trading strategy or a trading robot that automatically buys or sells in your MT4 account according to its algorithm. They are developed in the MQL4 language. The EAs are not limited to automated trading strategies, but they can also be used in automating your trade management system The MetaTrader 4 platform gives you a wide range of tools to successfully create your own Expert Advisor, backtest your Expert Advisor, as well as to debug possible errors in your algorithm. A library of the available EAs in your MT4 platform can be found in the Navigator window (see Figure 1).
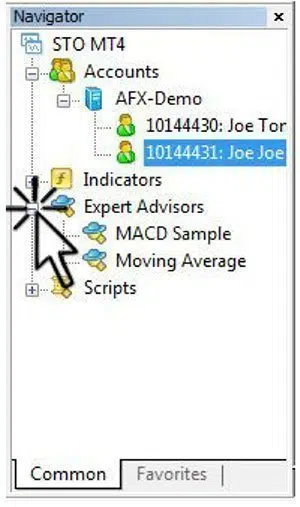
Figure 1: MT4 Experts Advisors
How to Install Expert Advisors
The process of manually installing an Expert Advisor is quite simple. First, locate the installation files on your MetaTrader4 platform, as this where we’re going to copy and install our Expert Advisors directly to into the MT4 platform. To do this click, File ‐‐> Open Data Folder (see Figure 2).
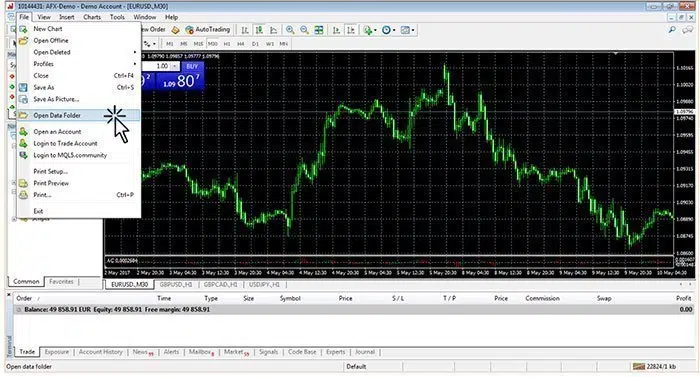
Figure 2: MT4 Open Data Folder
It’s important to note that there are two types of files (see Figure 3) for an Expert Advisor:
- The MQL4 file which can be edited through MetaEditor.
- The EX4 file which is the compiled file and it can’t be edited.
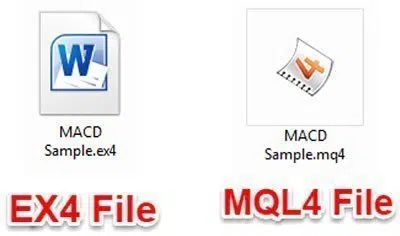
Figure 3: EA Type of Files
The next step is to copy-paste your Expert Advisor file into the MQL4 Experts folder (see Figure 4)
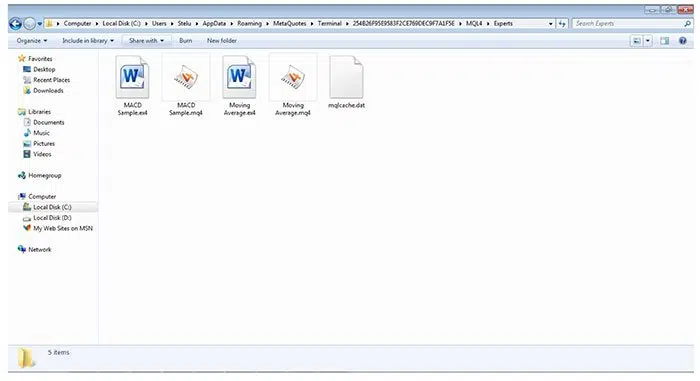
Figure 4: EA Installation Folder
After the installation is completed, restart the MT4 platform in order for the Expert Advisors to become available. It’s important to restart the program after installing an Expert Advisor so MT4 can recognize the new files. The Expert Advisors are located under the Expert Advisors drop down menu inside the Navigator window (see Figure 1). In order to launch the Expert Advisor, you have to drag and drop it into the chart. Once the EA is attached to the chart, you will be able to see the name of the Expert Advisor at the top right‐hand side (see Figure 5). There are three Expert Advisor status modes which are indicated by different icons:
- X means that the EA is disabled;
- ☹means that the EA is enabled, but the option “Allow Live Trading” is disabled;
- ☺ means the EA is enabled and is working properly;
The next step is to check the AutoTrading settings under the Menu ‐‐> Tools ‐‐> Options ‐‐> Expert Advisors tab. This needs to be done in order for the platform to allow your EAs to run. Once the “AutoTrading” option is checked then your EA is ready to run.
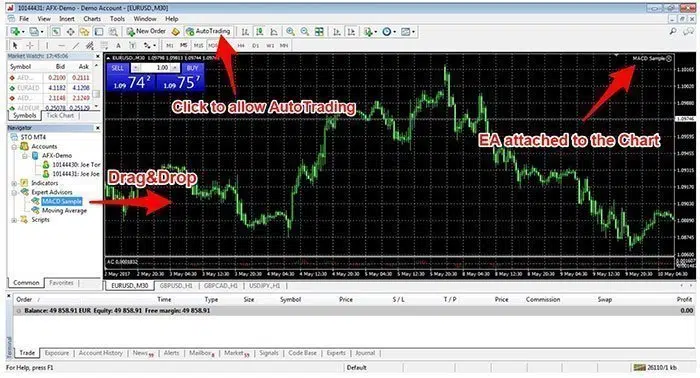
Figure 5: MT4 AutoTrading
Strategy Tester Window
The Tester window (CTRL+R) has two functionalities – one for the purpose of backtesting and the other is for EA optimization. Backtesting allows you to see the functionality and profitability of your Expert Advisors.

Figure 6: Tester Window
Chart Options
A chart is a visual representation of the price movements at any given time. The MetaTrader 4 platform offers you the possibility to open up to 99 charts simultaneously. The charts are customizable, and you can open a chart for FX pairs and CFDs. There are numerous ways to open a new chart:
 Select this icon from the standard toolbar.
- From the Main Menu, go to File –> New Chart.
- From the Market Watch window, select the instrument you wish to open a new chart for and click “Chart Window.”
All new charts will have the default template applied automatically, which can then be modified. A new chart window can be opened in an offline environment but the chart will not be updated in real time with new price quotes. To do this select File –> Open Offline.
Chart Types
The MetaTrader4 terminal has 3 types of charts:
Bar Charts
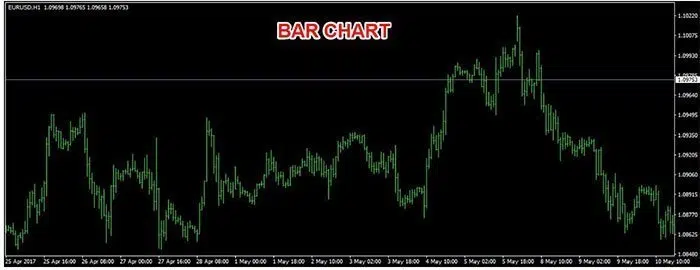
Figure 1: Bar chart
To create a bar chart, click the button on the Chart toolbar or press ALT+1.
Candlestick Charts
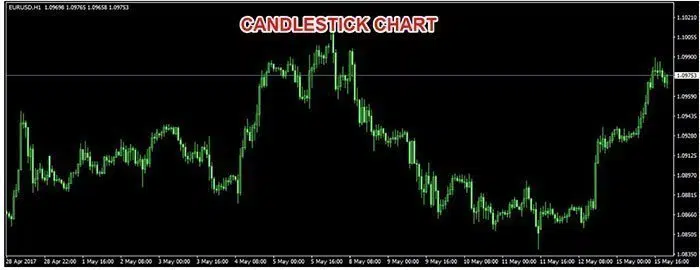
Figure 2: Candlestick Chart
To create a candlestick chart, click the button on the Chart toolbar or press ALT+2.
Line Charts
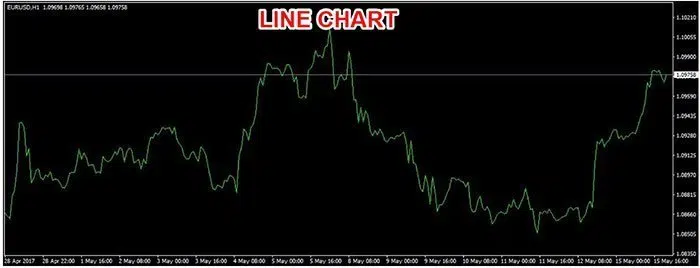
Figure 3: Line Chart
To create a bar chart, click the button on the Chart toolbar or press ALT+3. MetaTrader4 offers you the following time periods: 1 Minute, 5 Minutes, 15 Minutes, 30 Minutes, 1 Hour, 4 Hours, Daily, Weekly, and Monthly. You can create a chart for the time you want by using the Timeframes toolbar or by right-clicking on the chart and selecting Timeframes.
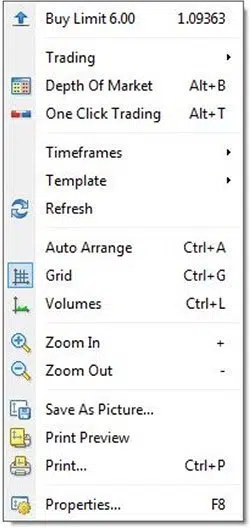
Figure 4: Chart Dropdown Menu
Other timeframes toolbar functions are:
- Zoom in and out on the chart.
- Refresh the chart, which should fix your charts if there are missing price data.
- Grid, which enables/disables the grid.
- Volumes, which show/hide the volume bars.
- Template lets you manage your templates and apply a new template to your current chart.
- Timeframes, which let you switch the time periods.
- Trading Functionalities.
- Saving a copy of the chart to your computer.
Chart Settings
MT4 Chart Settings can be managed individually for each chart. Right-click on the chart, then select Properties, or you can press the F8 hotkey. The properties window is used to change the colors used in the chart.
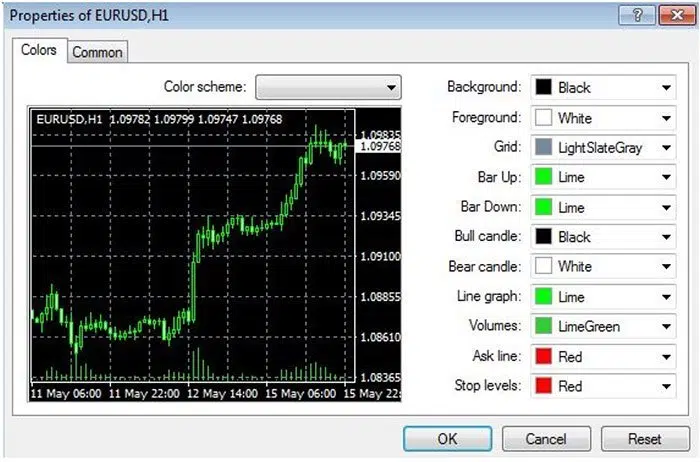
Figure 5: Chart Properties
- Background – Lets you change the background color;
- Foreground – Lets you change the color of axes and current price line;
- Grid – Lets you change the chart grid color;
- Bar Up – Lets you change the bar up candle;
- Bar Down – Lets you change the bar down color;
- Bull candle – Lets you change the color of the Bull Candle body;
- Bear candle – Lets you change the color of the Bear Candle body;
- Line graph – Lets you change the line chart color;
- Volumes – Lets you change the volume bar color;
- Ask line – Lets you change the color of the Ask line;
- Stop levels – Lets you change the levels of stop orders (Stop Loss and Take Profit).
The Common tab offers you different types of commands and functions. These functions have already been discussed throughout this guide, and they are very intuitive to follow.
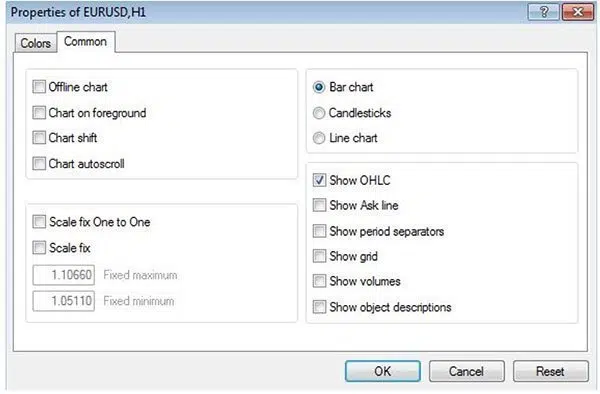
Figure 6: Properties – Common
After you’re done, click OK to save the changes.
Technical Indicators
A technical indicator is a mathematical calculation based on the historic price and/or volume that helps a trader forecast future market direction. Technical indicators are a huge benefit to traders, particularly if you have a nice charting package. Technical indicators fall into two categories:
- Trending indicators like Moving Averages, which can help identify the market trend.
- Oscillators like the Stochastic indicator, which helps assess the strength of the trend, and to find pivot points in the market.
A technical indicator is a great tool to help time the entry and exit of a trade.
How to Apply a Technical Indicator
The easiest way to add a technical indicator over a chart is by clicking the button on the chart toolbar, which calls the indicators sub-menu from where you can choose your desired technical indicator. Usually, if it’s an oscillator indicator, it will appear in a separate indicator window at the bottom of the chart window.
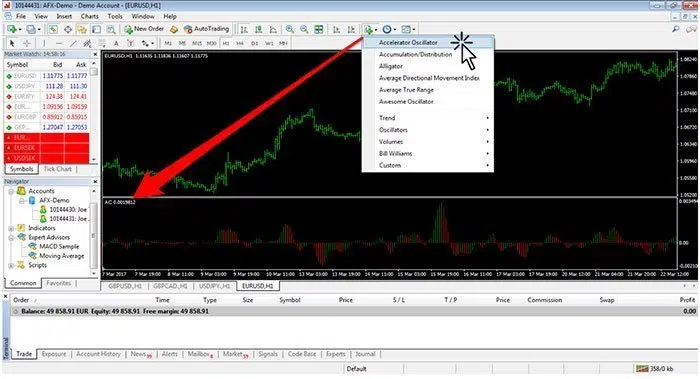
Applying Indicators Directly from Chart Toolbars
A second method to apply a technical indicator to a chart is to drag-and-drop the desired indicator from the navigator window onto the chart. If you choose a trending indicator like a Moving Average this will be applied directly to the price chart.
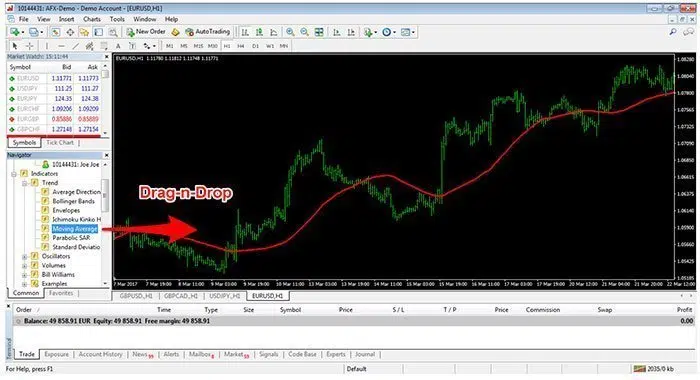
Applying Indicators Directly from Navigator Window
Finally, you can access the indicators library directly from the Main Menu. Simply go to Menu –> Insert –> Indicators and choose your preferred technical indicator.
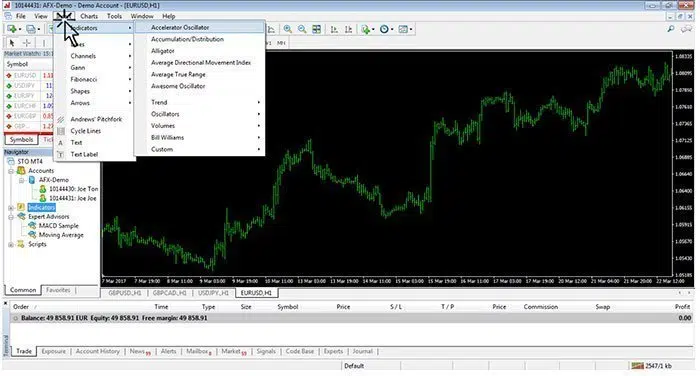
Applying Indicators Directly from Main Menu
Installing Indicators
The process of manually installing a technical indicator is quite simple. Locate the installation files on your MetaTrade4 platform, and copy and install our technical indicator directly to your MT4 platform–> File–> Open Data Folder. Locate the MQL4 and Indicator folder where all the indicators are stored, and copy your indicator in there.
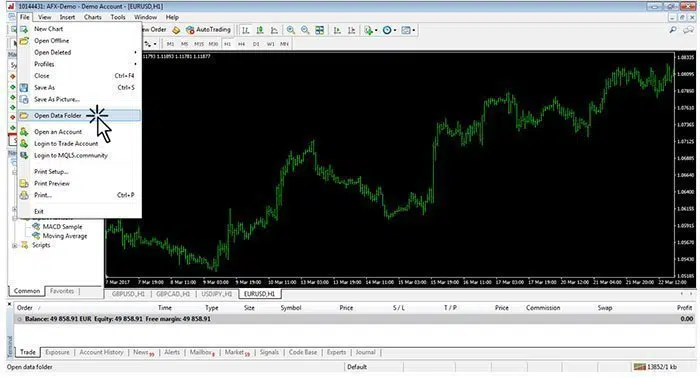
Open Data Folder
After installation is completed, you’ll have to restart the MT4 platform in order for the technical indicator to be viewable in the MetaTrader4 platform. It’s important to always restart after installing the technical indicator, so the MT4 can recognize the new files you have added.
Indicator Settings
All indicators have settings and parameters that can be changed. When you apply an indicator you can modify the settings according to your own trading needs. Usually, a new window with indicator settings will pop up when you try to attach an indicator to a price chart on the MT4 terminal. For the purpose of this tutorial, we have chosen the RSI indicator to exemplify what type of settings are available to you:
- Period: These are the analytical parameters used to calculate the technical indicator.
- Apply to: You need a price reference one which your indicator parameters should be applied. You can choose between, the High, Low, Open, Close, Median prices, and Weighted close.
- Style: You can choose your preferred color for various elements, including the size and the thickness of the indicator lines.
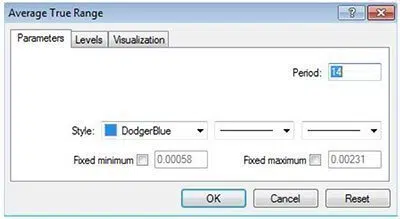
RSI – Technical Indicator Settings
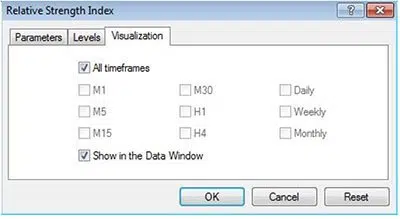
Under the “Levels” tab you can change the indicator settings, which will vary from one indicator to another. Since the RSI is a momentum indicator you only have the 30 and 70 levels as these are the standard RSI overbought and oversold levels. 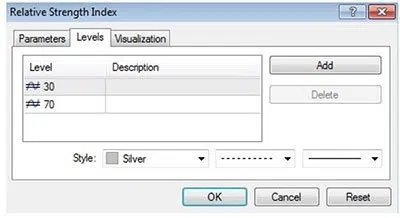 Under the “Visualization” tab you can change which timeframes the indicator is visible on, and on which timeframes the indicator is hidden.
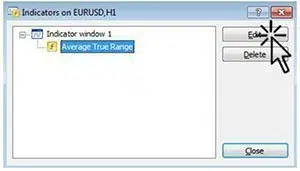
  Alternatively, you can double-click on the indicator to access the indicator settings. As a third option you can access the indicator settings from the top menu: Charts –> Indicators List –> select your preferred technical indicator and select “Edit.” To remove an indicator from your price chart, you simply have to click on “delete”.
Profiles and Templates
A profile is the best way of managing a group of charts. A profile gives a trader the possibility of saving a group of charts and settings, which is useful if the trader regularly uses the same charts. Whenever you open a saved profile, the group of charts with the saved settings will open exactly in the same position they were in when the profile was saved. You can save as many profiles as you wish under different names, and delete unused ones. The name of the current profile is shown at the bottom status bar window, which is the default profile created when the MT4 platform was installed.
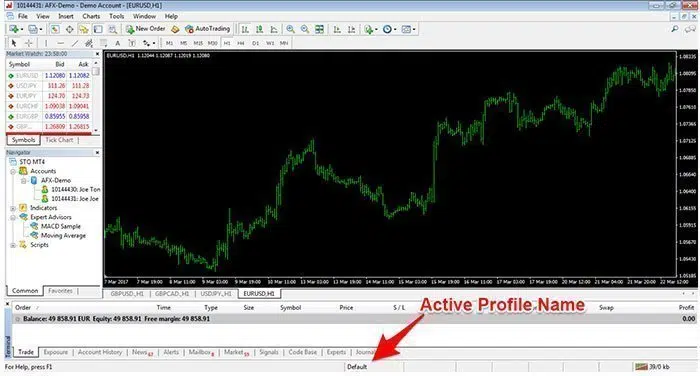
Active Profile Name
How to Create a New Profile
The simplest method, to create a new profile is by clicking the ![]() button on the main toolbar. To manage all profiles, and switch between them, go to the main Menu–> File –> Profiles. The “Save Profile” command and this will open a new window where you can choose your preferred profile name.
button on the main toolbar. To manage all profiles, and switch between them, go to the main Menu–> File –> Profiles. The “Save Profile” command and this will open a new window where you can choose your preferred profile name.
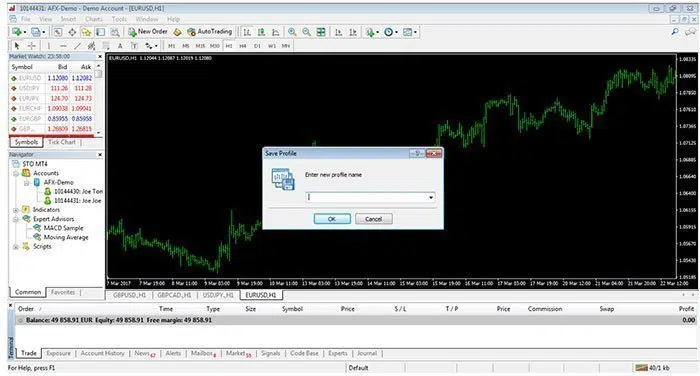
Save Profile Window
Managing Templates
A template is a collection of chart settings that can be saved and applied to other charts. A template will help you save your preferred chart settings. These include:
- Chart types.
- Favorite Color Settings.
- Used Indicators and Indicator settings.
- Line Studies.
- Used EAs.
- Chart Scale.
When you apply a new template to a price chart, the saved chart settings will be attached to the new chart. Once you have selected your preferred template settings you can save a new template by pressing the ![]() button on the Chart toolbar. You can also manage all templates, and apply newly saved templates, from the Main Menu –> Charts –> Template. The “Save Template” command will open a new window where you can choose your preferred template name.
button on the Chart toolbar. You can also manage all templates, and apply newly saved templates, from the Main Menu –> Charts –> Template. The “Save Template” command will open a new window where you can choose your preferred template name.
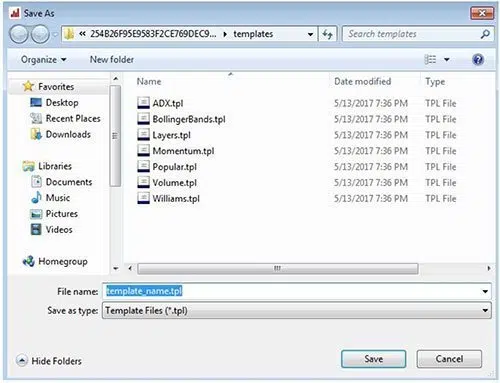
New Template Window
You can use the same template on as many charts as you wish. If you want to assign a predefined template to a trading account, the template name must coincide with the number of the trading account. If you want to modify a template or delete an old template, you have to select the corresponding template by pressing the![]() button on the Chart toolbar to select the appropriate command. The profiles and templates functionalities are designed to make your MT4 experience more efficient. Both are particularly useful tools if you have preferred settings you want to attach to multiple charts.
button on the Chart toolbar to select the appropriate command. The profiles and templates functionalities are designed to make your MT4 experience more efficient. Both are particularly useful tools if you have preferred settings you want to attach to multiple charts.


